

How To Make Iron On Transfer With Cricut
Have you ever wanted to use Cricut Iron-On Vinyl but didn't know how to get started? If so, this article is for y'all.
In this comprehensive blog postal service, I'll testify you the simple steps to cut and apply Atomic number 26-On vinyl with your Cricut machine. I'll also give you my best tips and tricks and so that you become great results every fourth dimension.
Iron-on vinyl is one of the virtually popular materials for crafting with a Cricut machine. You can use iron-on vinyl to brand all sorts of projects, similar custom vinyl shirts, hats, sheet tote numberless, and so much more.
But, when you lot're new to Cricut, fe-on vinyl can exist a piffling intimidating. If you want to learn more near using your Cricut to create Atomic number 26-On vinyl projects but aren't sure where to begin, this blog mail is for you lot.
In this tutorial, we're going to get over how to work with fe-on vinyl.
- Beginning, I'll explicate the dissimilar types of vinyl and get over what materials you lot need for iron-on projects.
- Then, I'll show you step-past-step how to blueprint, cut, and weed your vinyl decal.
- Finally, I'll give you tips and tricks for applying iron-on vinyl for the best results.
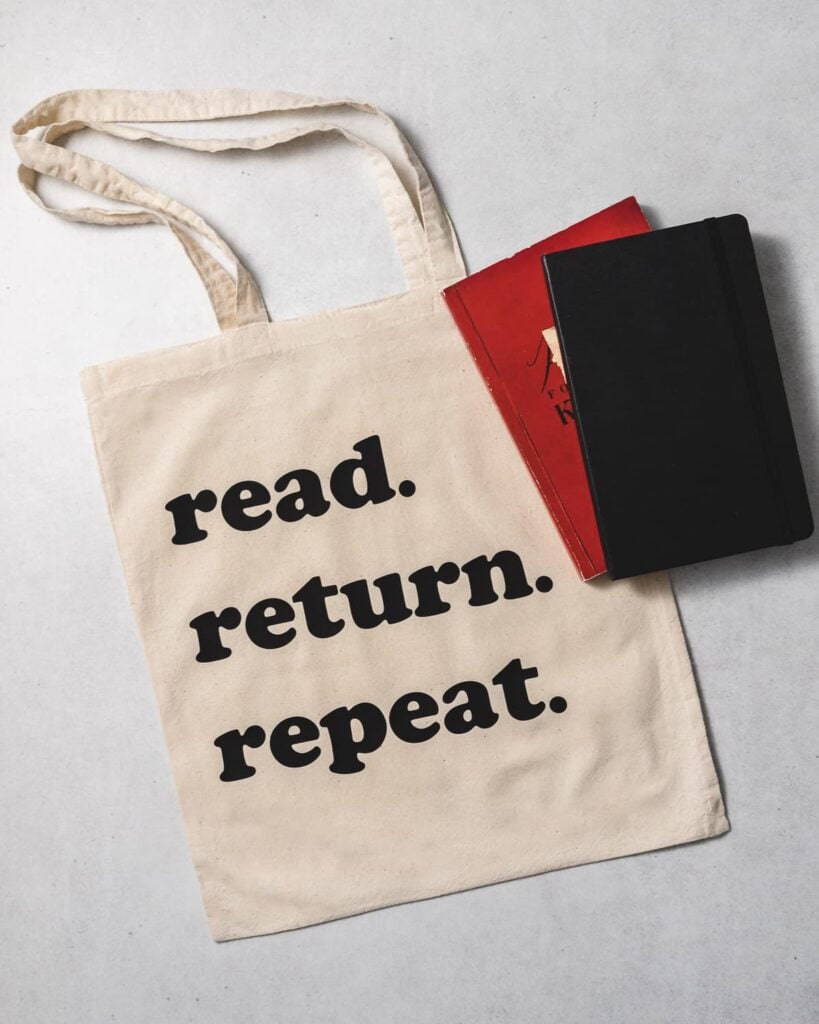
I'll exist making a uncomplicated library-themed canvass tote purse for this project. Feel free to follow along. Merely if you would rather make a vinyl shirt with Cricut, you may prefer this post: How to Make Shirts with Cricut Atomic number 26-On Vinyl
Brand new to Cricut? You lot may desire to read this Guide to Cricut for Beginners, or showtime with this article nigh which Cricut is right for y'all.
What is Iron-On Vinyl?
Let's start at the very beginning with a bit of information about fe-on vinyl itself.
Iron-on vinyl is a special type of vinyl material with a estrus-activated adhesive. It's sometimes chosen heat-transfer vinyl or HTV, for short.
Y'all tin use iron-on vinyl on a variety of base materials, including material, metal, paper, and even wood. To apply iron-on to your projection, you'll press information technology with a oestrus source, like a household iron or a Cricut EasyPress.
Iron-on vinyl is a sparse, flexible textile that comes in pre-cutting sheets or rolls. When yous look closely, you'll come across that iron-on vinyl is made of ii layers: the colorful vinyl layer and a articulate plastic backing (sometimes called a plastic carrier sheet or articulate plastic liner).
To tell these two layers apart, look at the sheen of each side. You'll encounter a dull side and a shiny side. The irksome side is the vinyl, and the shiny side is the clear plastic carrier sheet.
Note: There are 2 principal types of vinyl – adhesive vinyl and fe-on vinyl. This mail is most fe-on vinyl. For a complete tutorial on adhesive vinyl, click here.)
Is Cricut Iron-On Vinyl the aforementioned every bit Heat Transfer Vinyl?
If y'all are new to the piece of work of craft vinyl, you may be wondering:What is the difference between fe-on and heat-transfer vinyl?
The answer is simple: nada! "Iron-on vinyl" and "heat transfer vinyl" (or HTV for brusk) are just dissimilar names for the same thing.
Cricut uses the proper name "Iron-on," while most other brands use the term "HTV." Either fashion, information technology'due south the same type of material.
Less commonly, you may besides see iron-on referred to equally rut transfer material and iron-on transfers.
Types of Fe-On Vinyl
Atomic number 26-on vinyl comes in a wide variety of colors and finishes. Yous can buy iron-on vinyl in a rainbow of colors, patterns, and finishes – even metallic foil and glitter. It'southward available to purchase in sheets, rolls, and packs.
Here are a few of the different types of iron-on vinyl:
- Sportflex Iron-On: thin, lightweight, and designed to stretch and flex on activewear fabrics similar polyester and nylon.
- Foil Iron-On: has a shiny, reflective finish in a diversity of metallic colors.
- Glitter Iron-On: has a shimmery, glittery effect in a variety of dissimilar colors.
- Patterned Fe-On: comes in a huge variety of trendy and classic patterns
- Holographic Fe-On: has an eyecatching multi-color stop that changes in the light.
- Smart Fe-on: tin exist cut without a mat on the Cricut Maker 3, Cricut Explore 3, and Cricut Joy models.
Multi-Layered Vinyl Designs: You can apply multiple layers of vinyl on meridian of each other to create multi-layer designs. Simply, it's important to apply the layers in the correct order to avoid bubbles or ripples. For example, yous can use regular iron-on on pinnacle of regular iron-on. And you can use regular iron-on as the base layer with different types of specialty iron-on on height. Merely you lot can't utilize regular iron-on on acme of glitter iron-on, for example.
Best Brands of Fe-On Vinyl
Many people get-go out with the Cricut brand Everyday Iron-On Vinyl. Cricut vinyl is very easy to work with, and I've had expert results with it. You tin can find it online and in most arts and crafts stores.
Another popular brand of iron-on vinyl is Siser Easyweed Vinyl, which is bachelor in more than l colors at Expressions Vinyl.
How to Use Cricut Fe-On
In the residuum of this article, I'll bear witness you step-by-pace how to cutting and use iron-on vinyl with a Cricut machine. I'll go over what materials y'all need, and give you step-by-step instructions for how to pattern, cut, and weed your vinyl decal.
You can use the following instruction as a guideline for a wide variety of fe-on projects. For t-shirt specific tips and instructions, check out: How to Brand Shirts with Cricut Iron-On Vinyl.
Materials Y'all'll Demand
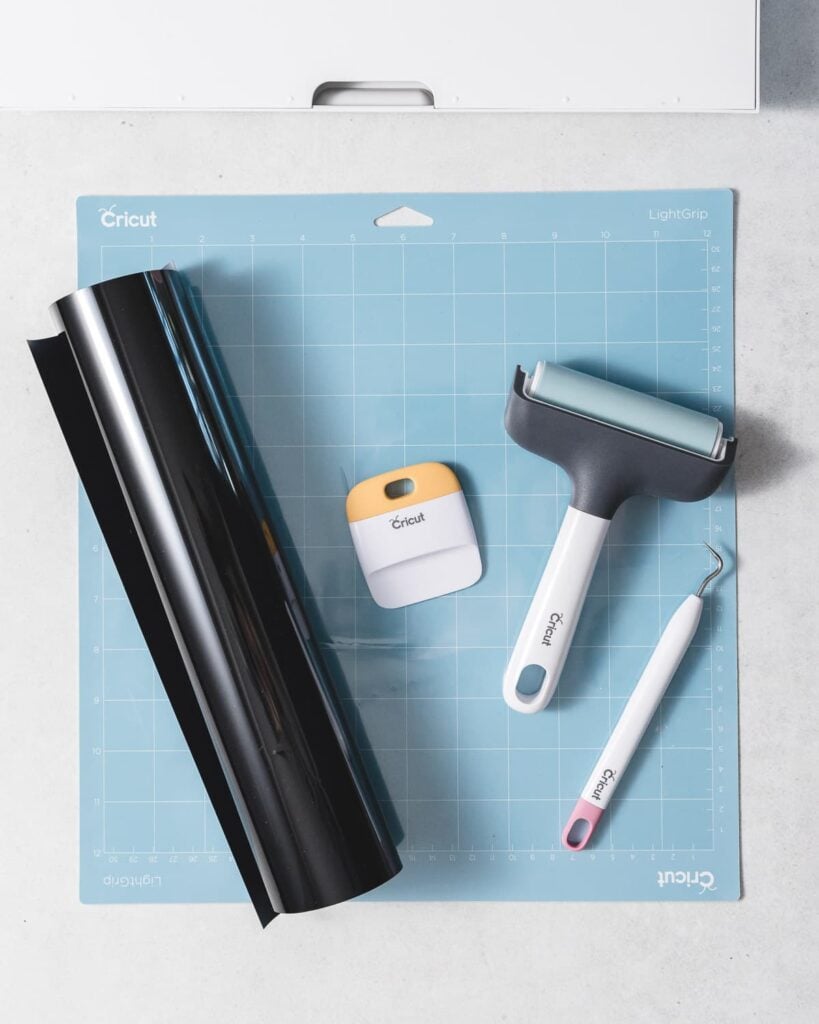
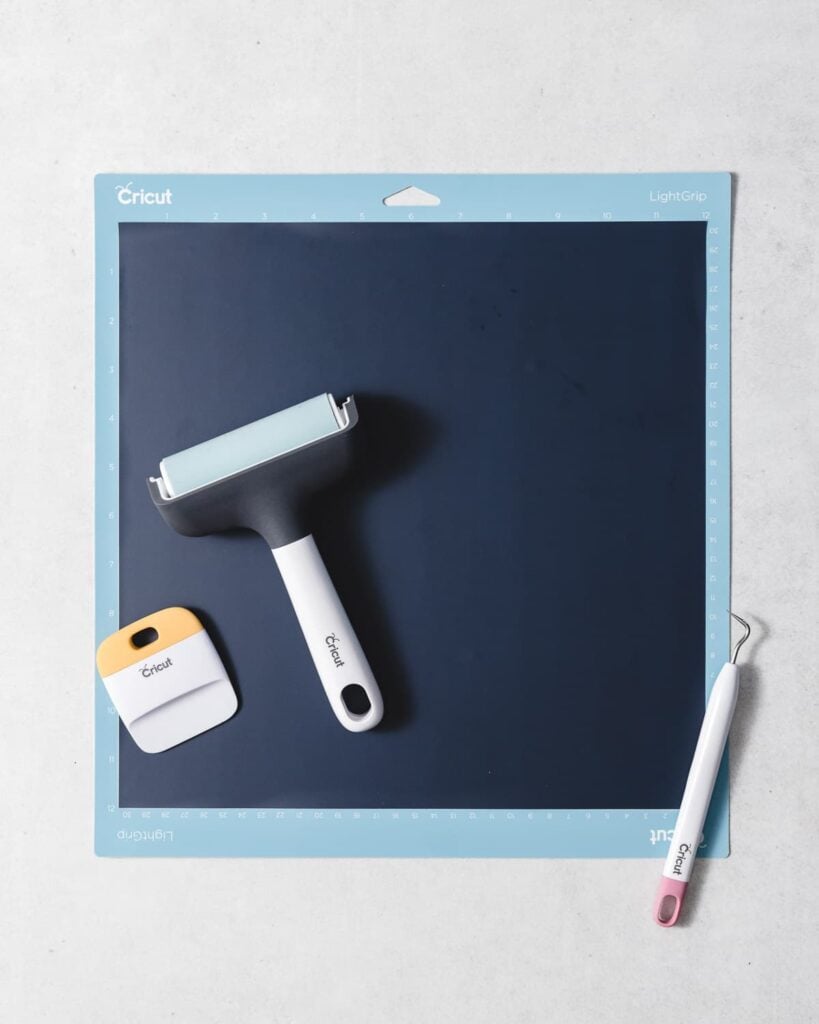
Here are the supplies and tools you'll demand to make a project with fe-on vinyl. If you'd like to follow forth with me, you'll need some black atomic number 26-on vinyl and a cotton canvas tote bag.
- Cricut Fe-On Vinyl
- Project base of operations material, similar a t-shirt or cotton canvas tote purse.
- Cricut auto (I use both the Cricut Maker and the Cricut Joy)
- Fine Point Bract
- Cricut Design Infinite
- LightGrip or StandardGrip Cutting Mat
- weeding tools
- Cricut EasyPress, regular household iron, or estrus printing
- Cricut EasyPress mat or a folded towel to protect your piece of work surface
For more than information virtually the Cricut tools you lot really need, read my Ultimate Guide to Cricut Tools and Accessories.
Note: In the photos that follow, I'll be using the blue LightGrip mat. You can also use a green StandardGrip mat, which has a piffling more than stickiness to grip the iron-on.
Preparation
For the best results, prewash your cloth base materials without fabric softener. Prewashing will pre-shrink the fabric and remove any oils or chemicals that may interfere with proper adhesion.
How to Cutting Iron-On Vinyl
The following stride-by-step instructions will show you how to cutting iron-on vinyl with your Cricut machine.
Create the Project in Pattern Space
Open Design Space and create a new project. You tin browse the Cricut Image library for a pre-made pattern, create your own design using the Pattern Space tools, or upload your own SVG cut file.
For my library-themed tote handbag, I created a typography-based design using the text tool in Cricut Design Space. I didn't like the size of the catamenia characters, so I added my own circle shapes instead. Then, I attached everything together and so it would stay in the aforementioned position when I sent it to the mat.
Afterward you create your epitome, you can resize it using the Resize handle or the Width and Height boxes in the Top Toolbar.
When your blueprint is complete, click the Make it Push button to send it to the mat.

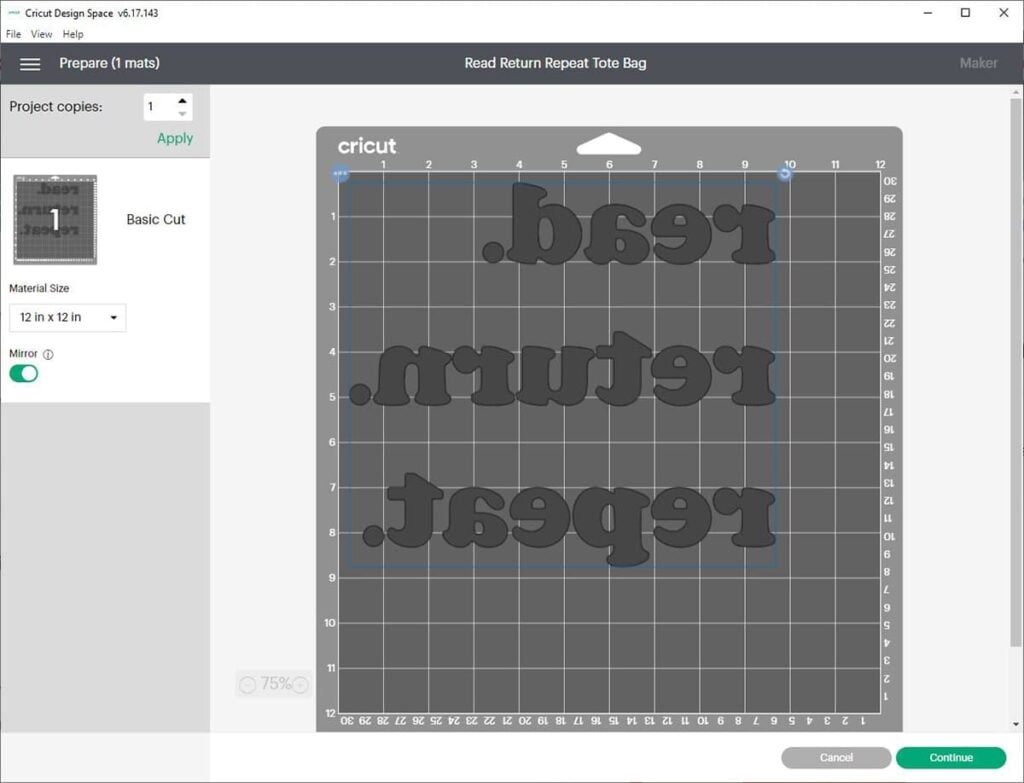
Mirror the Design
On the side by side screen, you'll run across the mat preview. Make certain to turn on the Mirror toggle then that your design is mirrored on the cutting mat. It will look like the blueprint is flipped upside-down, like a mirror prototype.
Why do you mirror fe-on vinyl?It'south important to flip the blueprint on the mat because nosotros cutting vinyl "upside-downward." To brand sure the design looks right when applied to the terminal project, we need to mirror the design before cutting.
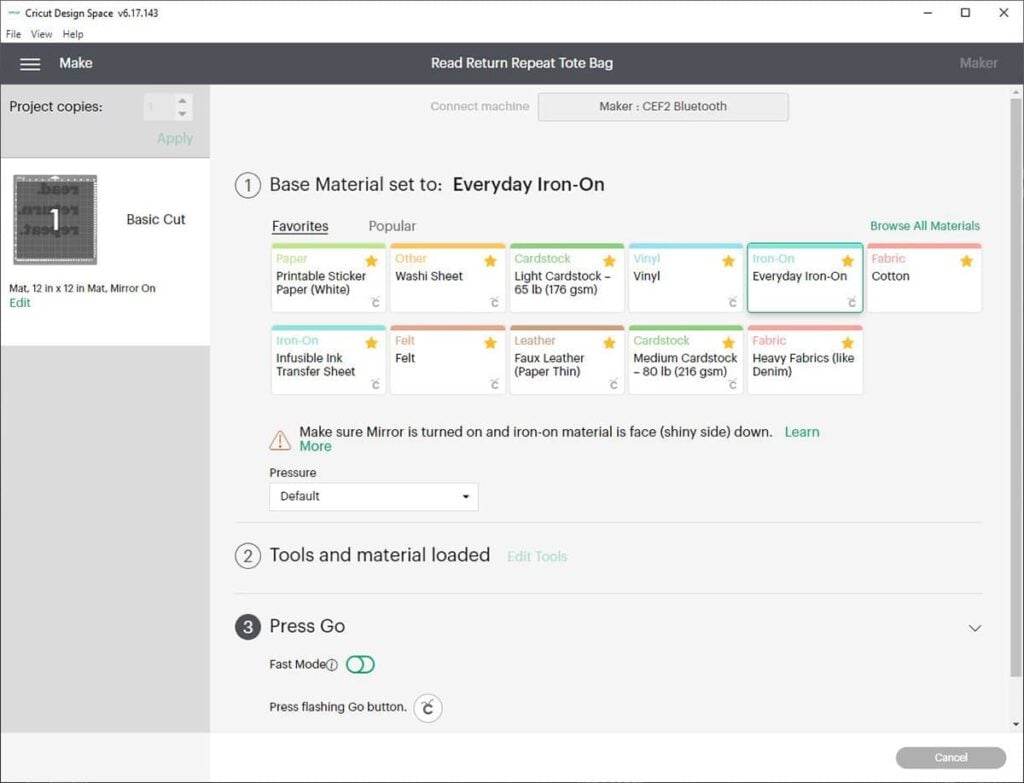
Choose the Textile Settings
On the next screen, you'll select your specific textile from the list of materials. Yous'll encounter that at that place are slightly different pressure settings for dissimilar types of vinyl, and then exist sure to select the correct ane.
If you are using Cricut Everyday Atomic number 26-On like I am, cull Everyday Iron-On from the materials list.
Next, make sure that you have the Fine-Point blade loaded into your machine. Afterwards that, y'all are ready to load your cut mat into the machine and start the cut.
Tip: When using a new-to-you fabric, it'south ever a good idea to outset with a test cut. Make a modest exam cut with a minor basic shape to verify you accept the right cutting settings earlier you commit to cut the whole project.
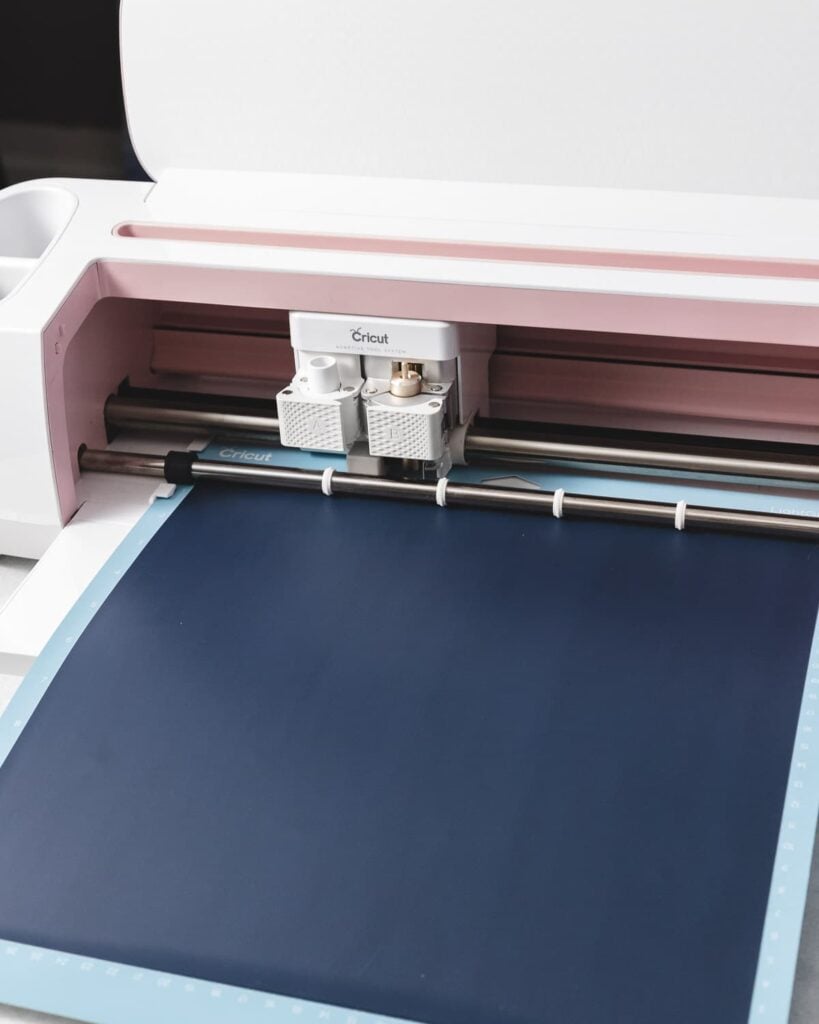
Place Vinyl on the Cutting Mat
Place the iron-on vinyl onto the cut mat "shiny side down." In other words, with the plastic carrier sheet facing downwardly.
You lot'll remember that iron-on vinyl is made up of ii layers: the ho-hum vinyl layer and the shiny plastic carrier canvass. Since we only want the Cricut to cut through the dull and get out the shiny plastic carrier sheet intact, we place the vinyl onto the mat with the carrier sheet facing down.
Side by side, use a brayer to make sure the vinyl has firmly adhered to the mat. If you don't have a brayer, you lot can use a scraper to do the aforementioned thing – merely employ gentle pressure and so you don't accidentally scrape the vinyl.
Make the Cut
Load the cutting mat into the automobile. If you're using Smart Fe-On with the new Maker 3, Explore three, or Joy, yous can load it into the cutting machine without a mat.
Press the flashing Become push to cut your blueprint. When the cut is consummate, press the Load/Unload button to unload the mat. Now it'south time to weed the design.
How to Weed Fe-On Vinyl
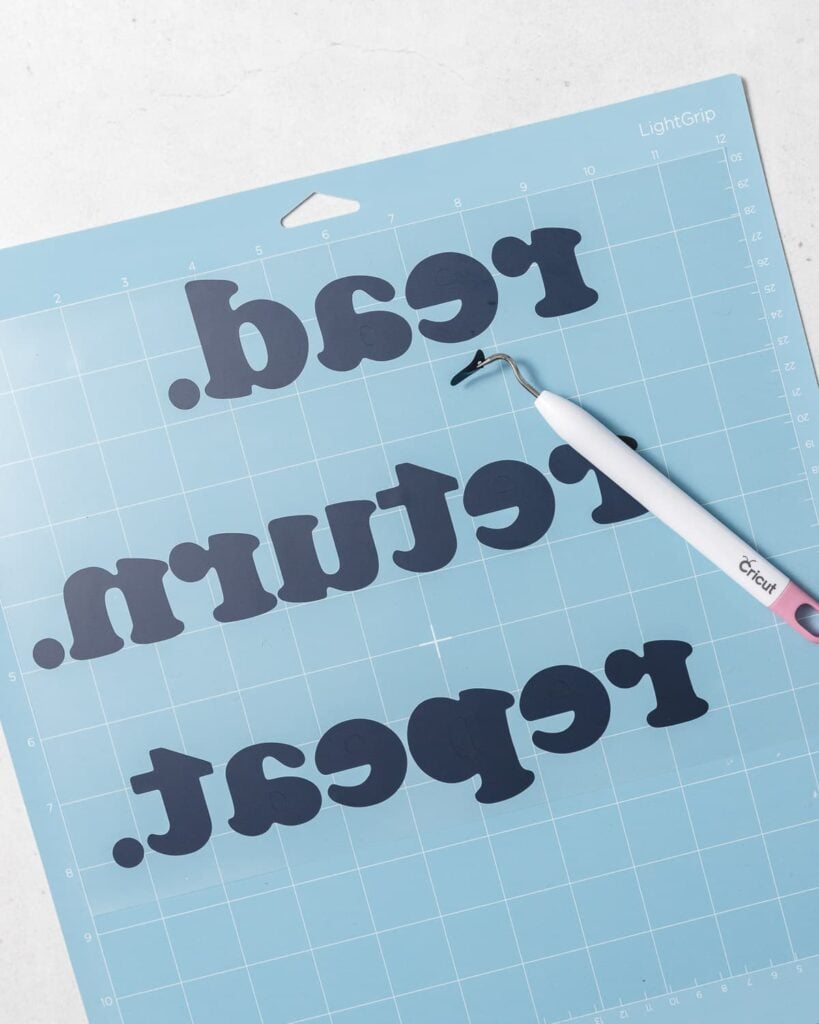
The next pace is to weed the blueprint. Weeding is the procedure of removing whatsoever excess vinyl that's not function of the pattern. Y'all'll remove the extra vinyl around the outside of your design and small pieces inside the design – similar the insides of certain letters.
To weed, press the pointy tip of the weeding tool into an surface area of vinyl you desire to remove. Grab it with the weeding tool, and gently pull up and peel it abroad.
You can use the hook-shaping weeding tool, tweezers, an X-Acto bract, your fingers, or whatever works. I often employ multiple weeding tools, depending on the intricacy of the blueprint and the size of the pieces I'one thousand trying to remove.

Weeding Vinyl Pace-by-Step
- Start by weeding the vinyl around the outside of your design.
- Then, remove the pieces on the interior of the design.
- Continue weeding until you've removed all the backlog vinyl, and all that'due south left on the plastic carrier sheet is your blueprint.
- And so, flip the sail over and see how your final design volition look once information technology's correct-side up. This is a good risk to double-check your work and make sure y'all have weeded everything you lot don't want on your final project.
Can't see the lines?
If you're having trouble seeing the lines of your design, try angle the sheet slightly to catch the low-cal. Or, hold up the piece of vinyl to a bright window to assistance you see the lines.
Cricut even makes a lightbox tool called a Brightpad, which is designed to aid you run into cut lines to make weeding easier.
Prepare to Use Atomic number 26-On Vinyl
Now it's time to use the vinyl to the project. For this step, yous'll need a firm pressing surface, a pressing mat to protect your surface, and a source of heat. In this section, I'll testify you how to prep your materials for the best results and apply the vinyl.
Start, set up your workspace. Choose a house, flat pressing surface. You'll desire a solid surface that won't jerk or shake when yous utilize force per unit area – and so avert flimsy ironing boards.
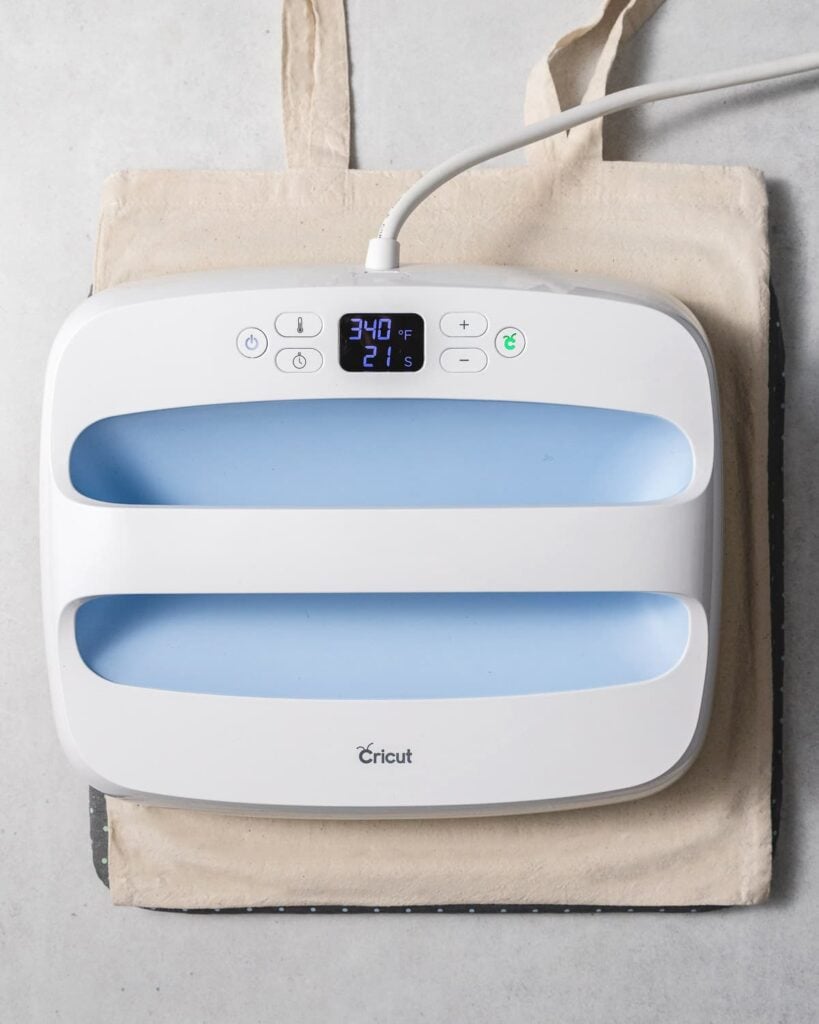
Side by side, protect your work surface with an EasyPress mat or a clean, folded towel. (I prefer using a pressing mat because folded towels have lumps and bumps that can interfere with your transfer.
Then, preheat your EasyPress or iron. Apply the Cricut Rut guide, which will tell you the exact temperature and pressing fourth dimension yous need according to the type of vinyl and base of operations fabric you have.
If you are using a household fe, adjust the temperature to the best of your ability. In almost cases, yous'll cull the Cotton/Linen setting, which is usually the highest temperature. Brand certain to plough the steam setting to OFF.
Adjacent, prep your base of operations material. Lay it out flat on the clean EasyPress mat, and smooth out whatsoever wrinkles. Utilise the EasyPress to preheat the fabric for 5 seconds. (This will also assistance remove any wrinkles.)
How to Apply Iron-On Vinyl
Now that everything is prepped and ready to become, we can really utilize the vinyl.
Start, heart the vinyl blueprint on the base material. You lot can use a ruler to find the middle of the base of operations material. Or, yous can fold it in half and make a pucker to mark the centerline.
Then, place the vinyl design on the base material with the shiny side upwards. (Recollect, this means that the plastic carrier sail is up, and the ho-hum vinyl side is downwards, with the heat-sensitive agglutinative touching the cloth.)
Next, use estrus to the vinyl design as instructed by the Cricut Heat Guide. The Cricut Estrus Guide will tell yous exactly what fourth dimension and temperature to utilize for your specific blazon of vinyl and base material.
So, flip the project over and utilize oestrus to the dorsum of the design as instructed by the Cricut Oestrus Guide.
Example: For cotton canvas bags, press with light pressure at 340°F for 30 seconds. And so flip and press for an additional 15 seconds.
After that, let the project cool to the touch. Then carefully peel off the plastic transfer sheet.
Tip: If y'all're using new-to-you materials, I encourage yous to do a small examination in an inconspicuous area before committing to the entire blueprint.
Warm Peel vs. Absurd Peel
Some types of vinyl are labeled "warm peel." Some are labeled "cool peel" or "cold pare."
These labels refer to the temperature at which you should remove the plastic carrier sail from the project for all-time results.
For example, Cricut Everyday Iron-on is "Cool Peel." This means that you lot must allow the shirt to cool to the touch earlier removing the plastic liner. If you remove the liner while it's nevertheless warm, the iron-on vinyl may not attach correctly.
Other types of vinyl call for a "Warm Pare," which means you must remove the plastic canvass while it's nevertheless warm. Brand certain to read the package to know what kind of vinyl you have!
How to Intendance for Cricut Atomic number 26-On Projects
After making your atomic number 26-on projects, you'll desire to wash them carefully to ensure they concluding as long every bit possible.
Hither'southward somecommunication for washing fe-on projects:
- First, await 24 hours after applying the vinyl before washing the project.
- 2nd, turn the project within out earlier washing. You tin launder and tumble dry out your iron-on projects, but avoid the highest heat settings.
- Don't utilise bleach.
- If whatsoever areas of iron-on vinyl lift after washing, you may exist able to reapply it. Just follow the original Heat Guide awarding instructions to re-adhere the iron-on to the base material.
Tips and Tricks for Atomic number 26-On Vinyl
Here are a few tips and tricks to continue in heed when working with fe-on vinyl.
- Identify the fe-on onto the mat with the "shiny-side down". That means carrier sheet down, deadening vinyl facing up.
- Remember to mirror the pattern! This is i of the almost of import steps, and information technology's easy to forget!
- Select the right cut settings, so that you don't cutting through the carrier sheet. The carrier canvass acts equally your transfer tape, so you lot want to go on it in i piece.
- Press at the correct temperature. Besides much oestrus tin wrinkle or warp the pattern.
- Utilize a dry iron. If you take a household iron, don't employ steam. Moisture volition forbid the vinyl from sticking to the fabric.
- Go on the iron withal. Don't movement the atomic number 26 around while pressing, or you risk shifting or wrinkling your vinyl blueprint.
- If you're unsure, do a test cutting and a exam application!
Troubleshooting Fe-On Problems
Atomic number 26-on vinyl can be catchy to get correct at commencement. If you're having trouble with your shirts, here are some things y'all tin try.
The Fe-on vinyl is not sticking downward.
Hither are a few of the most common reasons why your Iron-On vinyl isn't sticking to your project.
- First, prewash your projection to remove whatever dirt, oil, or other chemicals on the textile. These substances can interfere with proper adhesion.
- Adjacent, double-check that your Cricut EasyPress or household iron is set to the right temperature for your specific type of vinyl and material. Reference the Cricut Estrus guide to encounter the recommended settings.
- Then, ensure that the EasyPress or atomic number 26 makes complete contact with the unabridged pattern. Bumpy work surfaces, seams, zippers, or folds can prevent the EasyPress from making full contact with the vinyl. To avert this problem, I recommend using an EasyPress mat on a business firm, flat piece of work surface. Similar I mentioned above, ironing boards can often be besides soft and flexible to give proper support.
- Retrieve to utilise heat to both the forepart and the back of the design. Again, you lot tin bank check the Cricut Rut Guide for the recommended amount of time.
- If all else fails, you lot tin endeavor to reapply the vinyl. Line upwards the design, encompass with a Teflon protective sheet, or press cloth and press the front and dorsum of the shirt with heat for an additional 10-15 seconds.
The vinyl is peeling or bubbling right after applying.
First, make certain that you take the correct estrus settings. Vinyl tin bubble or distort if y'all press it with too much heat for also long.
So, make sure to peel off the plastic carrier sheet at the right fourth dimension. Remember how we talked near that some types of atomic number 26-on vinyl are Warm Skin, and some are Cool Skin? Vinyl can bubble or skin if y'all peel off the plastic carrier canvas at the wrong temperature. Make sure to double-cheque the package instructions and peel the plastic canvas at the correct time.
The vinyl is lifting off afterward washing the shirt.
If the edges of the vinyl are lifting later on washing, they did not adhere properly. You tin can reapply the vinyl by repeating the initial application steps. Since you don't have the plastic carrier sheet anymore, you'll want to cover the design with a Teflon comprehend canvass or a clean pressing fabric.
Have questions? Join the Cricut Facebook Group!
I hope this article was useful for you! If you lot have any boosted questions, feel free to join my Facebook Grouping for Cricut Crafts.
Join the grouping to share pictures, ask questions, and help each other out.
More Cricut Tutorials and Projects
If y'all love to craft with Cricut, y'all'll bask these related posts.
- Cricut for Beginners: A Complete Guide to Your New Car
- How to Cut Vinyl with Cricut: A Step by Stride Guide for Beginners
- How to Upload Images to Cricut Design Space in 4 Easy Steps
What's Next?
Pin this postal service: Save this tutorial to your Pinterest boards so that y'all can come back to it later on.
Leave a comment: I love to hear your feedback. Tell me in the comments beneath!
Share on Instagram or Facebook: When y'all make this projection, share it on social media and tag me @sarahmaker. I love to come across what y'all make!
Instructions
- Prewash your base material, and ready your workspace.
- Create your blueprint in Cricut Design Infinite. Click Mirror to mirror the design on the mat. Choose Iron-on from the list of materials.
- Place the fe-on vinyl, shiny side downwardly, onto a blueish or green cutting mat. Load the mat into the machine. Press Go to start the cutting.
- When the cutting is complete, unload the mat, and weed your prototype.
- Preheat the base of operations material according to the Estrus Guide. Place the vinyl pattern on the base material with the shiny side upwardly.
- Apply rut every bit instructed by the Heat Guide. Leaving the liner on, flip the base material over and apply rut to the other side every bit instructed by the Heat Guide.
- Expect for the vinyl to cool to the bear upon, then pare away the clear liner.

Sarah Stearns has helped thousands of makers find their side by side arts and crafts project with costless patterns and step-by-step tutorials on her blog, sarahmaker.com. Read more than.
Her work has been featured in Scientific American, Good Housekeeping, Vocalisation, Flat Therapy, and more.

How To Make Iron On Transfer With Cricut,
Source: https://sarahmaker.com/cricut-iron-on-vinyl/
Posted by: rothenbergevours.blogspot.com
0 Response to "How To Make Iron On Transfer With Cricut"
Post a Comment